Turn Your Extra Nail Wraps into Stunning DIY Art & Accessories
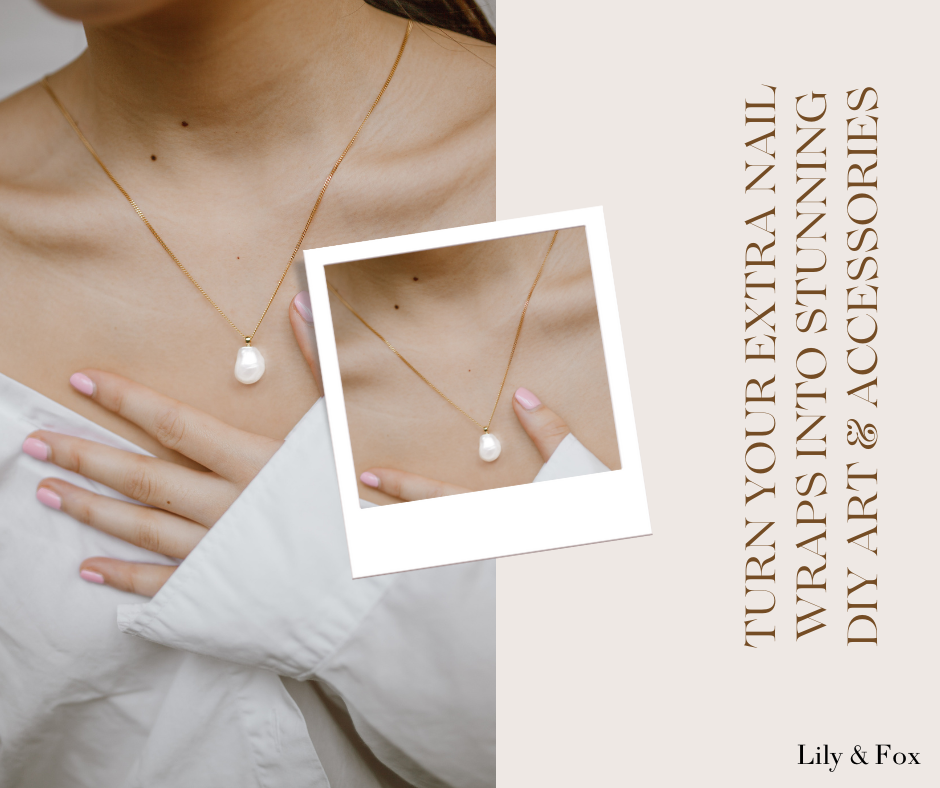
You've just finished putting on a beautiful Lily & Fox manicure, and your nails look perfect. But what about those small pieces of leftover nail wrap? They're too pretty to throw away, but too small for another nail. If you often feel this way, we have good news!
We're excited to show you a fun way to use those extra nail wrap pieces. You can upcycle them into unique, personalized jewelry and other DIY projects. It’s a rewarding way to get more out of your favorite designs and turn small scraps into something special.
Why Upcycle Your Wraps?
It’s all about getting more from less and expressing yourself in new ways.
-
Be Sustainable: Every little piece of wrap you use means less waste. It's a simple way to be a bit more eco-friendly and get more value out of every single Lily & Fox pack.
-
Get Creative: This is your chance to really play! Take those patterns and colors and turn them into something completely new. It's a fun way to unleash your inner artist, even if you don't think you're one.
-
Make It Personal: You'll create earrings, charms, or pins that no one else has. Imagine matching your jewelry perfectly to your current manicure – or designing a piece that's just uniquely yours.
The Essentials: Gathering Your Crafting Toolkit

Ready to start crafting? The beauty of this project is you don't need much! Here’s what you'll want to gather:
1. Your Lily & Fox Extra Pieces:
This is the star of the show! Remember, no scrap is too small. Even tiny pieces with just a hint of a pattern or a pop of color can become a stunning accent. Dig through your stash from past manicures – you'll be amazed at what you find.
2. Base Materials:
These are the foundations for your new jewelry.
Jewelry Blanks: Look for small, flat pieces of metal or wood designed for jewelry. These come in various shapes like circles, squares, ovals, or even custom shapes, perfect for making earrings, pendants, or ring bases. You can easily find these at local craft stores or through online craft suppliers.
3. Clear Cabochons or Resin Domes:
These are small, clear glass or plastic domes that you glue over your nail wrap design. They create a beautiful magnifying effect, protect your design, and give your piece a professional, finished look. They often come in sets with matching blanks.
Creative Ways to Use Leftover Nail Wraps for DIY Accessories & Stylish Crafts
Don’t throw away your leftover nail wraps! These small pieces can be transformed into beautiful DIY accessories and unique designs. Here’s how you can reuse your extra wraps to personalize jewelry, decor, and more — all while being creative and eco-conscious:
Mix-and-Match Nail Wrap Mosaic Designs
Get creative with a mix-and-match nail wrap look by combining small pieces from different styles or patterns. Cut leftover wraps into geometric shapes and arrange them on surfaces like jewelry blanks, phone cases, or notebooks to create a colorful nail wrap mosaic effect. This fun DIY project is perfect for bold, artistic expression and helps reduce waste.
Accent Accessories with Nail Wraps
Use tiny pieces of bold or glittery wraps to add accent details to plain accessories. Apply leftover nail wraps to earring studs, rings, or bracelet charms to create pops of color or sparkle. These small touches can turn basic items into statement fashion pieces — no salon needed!
Create Themed Jewelry Sets from One Nail Wrap Set
Turn a single manicure into a cohesive fashion statement by using leftover wraps to make matching jewelry sets. Design earrings and a pendant using the same pattern for a custom, coordinated look. Great for gifts or themed outfits, this sustainable idea makes the most out of every nail wrap.
Play with Pattern Placement for Unique Looks
Each wrap is full of detail — don’t be afraid to experiment with pattern placement. Cut different sections of the same nail wrap to highlight specific elements like florals, stripes, or gradients. This technique adds variety and ensures that every piece you decorate has a distinct and personalized design.
Layer Nail Wraps for Depth and Texture
Elevate your DIY designs by layering nail wraps. Apply a sheer, holographic, or glitter nail wrap over a solid-color base to create dimension and visual interest. Finish with a top coat or sealant for durability. This subtle layering technique works beautifully on jewelry, keychains, and even compact mirrors.
Other Ideas:
Personalize Your Tech & Gadgets
-
Phone Case Accents: Add small strips or cutouts to the back of a clear phone case for a customized look. You can create stripes, geometric patterns, or just a little pop of color.
-
Earbud Case Makeover: Give your plain earbud case (like AirPods or other wireless earbud cases) a fresh new look by carefully applying small wrap pieces.
-
Charger Decor: Wrap a small section of your phone charger block or a USB drive for easy identification and a touch of flair.
-
Laptop/Tablet Decals: Create small, custom decals for your laptop or tablet cover. Think tiny flowers, a subtle pattern, or your initials.
Elevate Your Stationery & Organization:
-
Custom Paperclips: Adhere small, colorful bits of wrap to the flat tops of large paperclips for a fun touch on your documents.
-
Binder Clip Bling: Decorate the metal handles of binder clips to make your desk supplies prettier.
-
Journal/Planner Tabs: Cut tiny strips of wrap and fold them over the edge of planner pages or journal dividers to create colorful, personalized tabs.
-
Pen/Pencil Wraps: Add a thin strip around the top of a pen or pencil for a custom look that’s easy to spot.
-
Gift Tags & Cards: Use wrap cutouts to add unique embellishments to homemade gift tags, greeting cards, or scrapbook pages.
Home & Decor Touches:
-
Tealight Candle Holders: Decorate plain glass tealight holders with strips or punched-out shapes from your wraps. When the candle is lit, the light will shine through the design!
-
Small Picture Frames: Add a decorative border or small corner accents to plain photo frames.
-
Key Identification: Wrap a small piece around the head of a frequently used key to make it stand out on your keychain.
-
Coaster Accents: If you have plain ceramic or wooden coasters, you can add a small design in the corner or a border.
-
Mirror Embellishments: Add tiny, delicate details to the corner of a vanity mirror or a small handheld mirror.
Once your unique pieces are complete, share them with the world! Snap a photo of your upcycled jewelry, post it on your favorite social media platforms. Remember to tag us @lilyandfox and use #lilyandfoxnails so we can admire your ingenuity.
Your creativity is a huge inspiration to the entire Lily & Fox community. By sharing your projects, you're not just showing off your style; you're sparking new ideas and encouraging others to discover the fun and sustainable magic of nail wrap crafting. Let's spread the sparkle, beyond just our nails!
To end the blog, get inspired: here are some jewelry creations using Lily & Fox nail wraps, made by one of our lovely customers, Linnea H!


Also in Blog

Got a Brilliant Mani Idea? Lily & Fox Wants to Hear It!
We know you love expressing yourself through your nails, and we constantly see your passion for unique styles, vibrant patterns, and exciting themes. Many of you have even reached out with brilliant ideas, asking, "Can Lily & Fox create a specific design I've dreamed up?"
This blog post will detail exactly how you can submit your fantastic design ideas, give you a peek into the kind of inspiration we're looking for.

From Ziplocks to Binders: How Our Customers Store Their Wraps (and Why Our New Binders Just Changed the Game!)
One of the best parts of being in the Lily & Fox community is seeing just how creative everyone gets with their nail wrap collections. Every time we ask about storage, we’re amazed by the clever, resourceful, and sometimes downright hilarious setups you share. It’s a reminder that nail wraps aren’t just about the manicure—they’re a lifestyle, and even the way you store them becomes part of the fun. So let’s take a little tour through what we like to call the evolution of wrap storage, from simple beginnings to full-on collector strategies.
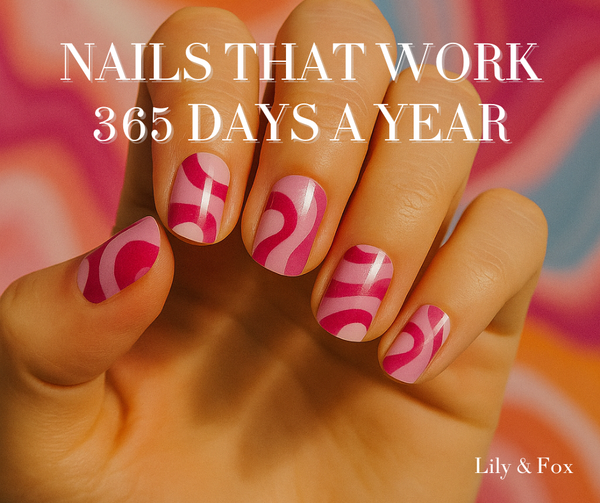
Nails That Work 365 Days a Year
At Lily & Fox, we believe your nails shouldn’t come with an expiration date. That’s where seasonless nail wraps come in: colors and designs that look good every single day of the year. Whether you’re heading to the office, hitting a wedding, or just grabbing coffee in sweats, seasonless wraps keep your nails polished, stylish, and totally stress-free.


Rebecca Fox
Author